

TL;DR:
- Field verification checks that installed MEP systems match approved design drawings and performance requirements. It involves real-time documentation and coordination to prevent costly rework and delays during project closeout. Properly conducted, it ensures efficient commissioning and reliable long-term building operations.
Field verification of MEP design conditions is the process of systematically checking real-world installations against design specifications to confirm accurate construction and system performance. Construction professionals who skip this step risk costly rework, failed inspections, and systems that never perform as designed. The industry term for this practice is "MEP design validation," and it covers mechanical, electrical, and plumbing systems from rough-in through final commissioning. This guide walks you through the preparation, execution, and closeout of a complete on-site MEP assessment using current best practices and modern tools.
What do you need before you field verify MEP design conditions?
Preparation determines whether your verification effort produces defensible results or just a pile of notes. Field engineers confirm site readiness and updated document accuracy before any physical inspection begins. Starting without a clean baseline is the single most common reason verification reports get challenged later.
Build your document baseline first
Your baseline package must include the approved design drawings, current shop drawings, and any issued-for-construction BIM models. Design documents specify performance intent while subcontractor shop drawings finalize the installed configuration. You need both. A discrepancy between the two is not automatically a field error. It may be a coordination gap that needs resolution before you even set foot on the floor.
Tools and team setup
The right tools cut verification time and protect your data. Here is what a complete on-site MEP assessment kit looks like in 2026:
- Mobile audit app with offline capability and real-time form submission
- BIM viewer accessible on a tablet for spatial reference during inspection
- 3D laser scanner or photogrammetry tool for high-stakes areas with tight clearances
- Photo and geo-tagging tools to timestamp and locate every piece of evidence
- Structured checklist organized by system type and floor zone
BIM-based coordination catches most installation conflicts before materials arrive, which means your field verification starts from a cleaner baseline when BIM has been used upstream. If the project skipped BIM coordination, budget more time for spatial conflicts during inspection.
| Role | Primary Responsibility |
|---|---|
| Lead field engineer | Scope confirmation, discrepancy sign-off |
| MEP inspector | System-by-system physical checks |
| BIM coordinator | Model-to-field spatial validation |
| Project manager | Conflict resolution and deadline tracking |
Pro Tip: Lock the document revision before mobilizing. Verifying against a drawing set that is still being updated produces findings that are immediately out of date.
How to conduct field verification for MEP systems step by step
Effective field verification requires a structured process with clear scope definition, a clean baseline register, on-site verification with timestamped evidence, and resolution of discrepancies before leaving the site. Skipping any of these steps creates gaps that surface during commissioning or, worse, after occupancy.
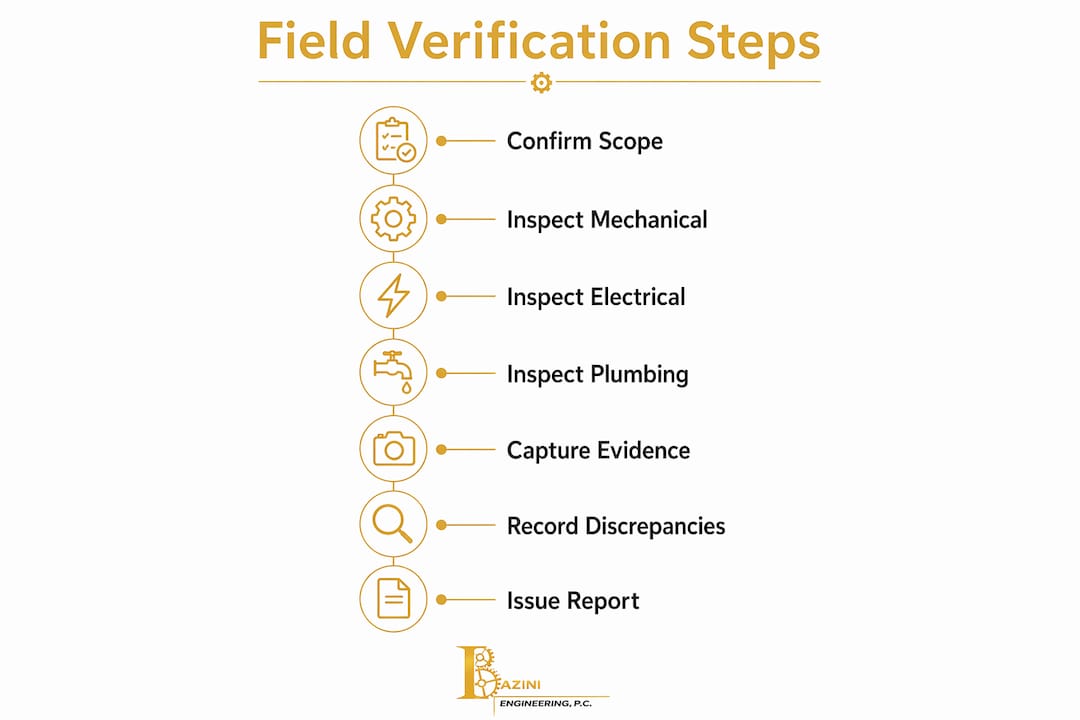
Step 1: Confirm scope and checklist alignment on arrival
Walk the site with the superintendent before opening your checklist. Confirm which zones are ready for inspection and which are still under active construction. Mark inaccessible areas on your checklist as deferred, not complete. This distinction matters when the final report is reviewed by the commissioning agent or the building official.
Step 2: Inspect mechanical systems
Mechanical inspection covers HVAC equipment location, duct routing, equipment clearances, and access panel placement. Check that air handling units are installed at the correct elevation and that duct sizes match the design schedule. Verify that vibration isolation is installed per specification. Record the nameplate data for every major piece of equipment and compare it against the equipment schedule in the design documents.

Step 3: Inspect electrical systems
Electrical verification focuses on panel locations, conduit routing, device rough-in heights, and equipment clearances required by the National Electrical Code. Confirm that electrical room dimensions match the design and that working clearances in front of panels are unobstructed. Check that grounding conductors are installed and that wire management matches the approved shop drawings.
Step 4: Inspect plumbing systems
Plumbing checks cover pipe material, slope on drain lines, fixture rough-in dimensions, and isolation valve placement. Confirm that cleanout locations are accessible and that pipe insulation is specified correctly for the system type. Verify that water heater locations and venting configurations match the approved drawings.
Step 5: Capture timestamped, geo-located evidence
Every finding needs a photo, a location reference, and a note written at the time of observation. Real-time, timestamped documentation prevents recall bias and maintains the legal defensibility of your data. Do not rely on memory to fill in details back at the office. The moment you leave the floor, your recall degrades.
Step 6: Record discrepancies and assign ownership
Log every discrepancy with a description, a photo reference, the responsible subcontractor, and a resolution deadline. Use a standardized format so the project manager can track status without interpreting field notes. Unresolved items must be closed before the commissioning agent begins performance testing.
| Discrepancy Type | Common Cause | Resolution Owner |
|---|---|---|
| Equipment location offset | Coordination error | Mechanical contractor |
| Conduit routing conflict | BIM not updated post-RFI | Electrical contractor |
| Drain slope insufficient | Field improvisation | Plumbing contractor |
| Missing access panel | Omission in shop drawing | General contractor |
Step 7: Issue the verification report
The report must include the inspection date, scope boundaries, a summary of findings, photo documentation, and a status log for each discrepancy. Distribute it to the project manager, commissioning agent, and relevant subcontractors within 24 hours of completing the site visit.
Pro Tip: Use a mobile audit app that auto-generates the report from your field entries. Manual transcription introduces errors and delays that undermine the credibility of your findings.
How to troubleshoot common challenges in MEP verification
The most frequent mistake in building system checks is treating design drawings and shop drawings as interchangeable. MEP design documents define performance intent while subcontractor shop drawings finalize the installed configuration. Field verification reconciles actual installation with both. When a discrepancy appears, your first question should be which document the installer followed, not whether the installer made an error.
Handling documentation conflicts
RFIs and change orders issued after the original drawing set create a version control problem. Subcontractors sometimes work from superseded drawings without realizing it. Before flagging a field condition as non-conforming, confirm the current revision of the relevant drawing. A condition that looks wrong against revision A may be correct against revision C.
Maintaining observer impartiality
Verification findings lose credibility when the inspector has a financial stake in the outcome. On projects where the design engineer also performs field verification, document the methodology clearly so the report can withstand scrutiny. Use checklists developed before site mobilization, not after, so the scope cannot be adjusted to avoid difficult findings.
Recall bias is the silent killer of field audit quality. An inspector who documents findings two days after the site visit is reconstructing memory, not recording fact. Mobile-first, real-time documentation is the only reliable defense.
Pro Tip: Assign a second reviewer to spot-check 10–15% of findings before the report is issued. Peer review catches both missed items and incorrectly flagged conditions.
Automated constructability checking using large language models and graph-based frameworks achieves 92% accuracy in detecting design violations in MEP. That accuracy rate signals where the technology is heading. Manual verification will remain necessary for physical conditions, but automated pre-checks will increasingly reduce the number of surprises found on site.
How does field verification connect to commissioning and project closeout?
Field verification and commissioning are related but distinct processes. Building commissioning verifies system performance, such as airflow rates and water temperatures, while final building official inspections confirm code compliance. A system can pass a code inspection and still fail to deliver the performance the design intended. Commissioning catches that gap. Field verification is what makes commissioning efficient.
Why verified field data matters for commissioning agents
A commissioning agent who arrives at a site with unresolved installation discrepancies cannot complete performance testing on schedule. Every open item from field verification becomes a delay in the commissioning sequence. Verified field data gives the commissioning agent a confirmed starting point. They can focus on performance measurement rather than discovering that a damper is installed backwards or a pump is rotating in the wrong direction.
Cost context for commissioning
Commissioning fees typically range from 0.5% to 1.5% of total MEP construction costs. That range reflects the scope of performance testing required. A thorough field verification process reduces the number of commissioning iterations needed, which keeps the project within the lower end of that range.
Integration with quality assurance and closeout
Field verification records become part of the project closeout package. Operations and maintenance teams rely on verified as-built conditions to understand what was actually installed. A verification report that documents equipment nameplate data, pipe materials, and device locations gives the facility manager a reliable reference for the life of the building. Projects that skip formal verification hand off a building that the maintenance team has to reverse-engineer from day one.
Key takeaways
Field verification of MEP design conditions is a structured, document-driven process that protects project quality from installation through long-term operations.
| Point | Details |
|---|---|
| Build a clean baseline first | Collect approved drawings, current shop drawings, and BIM models before mobilizing to the site. |
| Document in real time | Use timestamped, geo-located photos and notes on site to prevent recall bias and protect legal defensibility. |
| Distinguish document types | Design drawings define performance intent; shop drawings define installed configuration. Check both before flagging a discrepancy. |
| Connect verification to commissioning | Resolved field discrepancies let commissioning agents focus on performance testing, not installation corrections. |
| Include verification in closeout | Verified field records give operations teams an accurate reference for the life of the building. |
What I've learned from years of MEP field verification
The biggest gap I see on projects is not a lack of tools. It is a lack of discipline around document control before the site visit. Teams show up with the original design set and discover on the floor that three RFIs changed the routing, two shop drawings were revised, and nobody updated the BIM model. The verification becomes a scavenger hunt instead of a structured check.
Mobile technology has genuinely changed what is possible. A field engineer with a tablet, a BIM viewer, and a photo-tagging app can produce a more defensible report in four hours than a team with clipboards could produce in two days. The tradeoff is that the setup time is real. You cannot hand someone an app five minutes before they walk onto the floor and expect quality output.
The future of MEP design validation is heading toward automated pre-checks that flag likely discrepancies before the inspector arrives. That 92% accuracy rate in automated detection is not a replacement for physical inspection. It is a filter that tells you where to look first. The inspectors who learn to use those tools alongside their physical checks will be faster and more thorough than those who treat technology as optional.
The projects I have seen go sideways at commissioning almost always had the same root cause. Nobody formally closed the loop between what was designed, what was submitted in shop drawings, and what was actually installed. Field verification is that loop. Skip it and you are betting that three separate document sets and a dozen subcontractors all stayed perfectly aligned. That bet rarely pays off.
— Joseph
Baziniengineering's MEP engineering and verification services
Baziniengineering has delivered code-compliant MEP engineering for commercial, residential, and institutional projects across New York and Florida since 2010. The firm's engineers work directly with project teams on mechanical and plumbing system design from schematic through construction administration, including field coordination and BIM integration.

When your project reaches the field verification and commissioning phase, having the original design engineer involved reduces the time spent interpreting intent and resolving discrepancies. Baziniengineering's full range of MEP services covers HVAC, plumbing, electrical, fire protection, and energy code compliance. Contact the team to discuss how engineering support during construction can protect your project schedule and closeout quality.
FAQ
What does it mean to field verify MEP design conditions?
Field verification of MEP design conditions means physically checking installed mechanical, electrical, and plumbing systems against approved design drawings and shop drawings to confirm that construction matches design intent and performance requirements.
How is field verification different from a building inspection?
A building official inspection confirms code compliance. Field verification confirms that the installation matches the design intent and performance specifications, which goes beyond minimum code requirements.
When should field verification happen during a project?
Field verification should occur after rough-in is complete and before walls are closed, then again before commissioning begins. Catching discrepancies at rough-in is far less costly than correcting them after finishes are installed.
What documents are required for MEP field verification?
You need the current approved design drawings, the latest subcontractor shop drawings, any issued RFI responses, and the BIM coordination model if one exists. Verifying against outdated documents produces findings that may not reflect the actual approved scope.
How does field verification support commissioning?
Verified field data confirms that systems are correctly installed before the commissioning agent begins performance testing. Unresolved installation discrepancies delay commissioning and increase costs, which can push the project toward the higher end of the typical 0.5–1.5% commissioning fee range.